
My Headlines

Sunday, February 3, 2013

Konfigurasi MySQL Connector JDBC Di Ubuntu dan Windows

Step 1 : Kebutuhan 
    1. Jdk

  1. Xampp / Lampp
    Microsoft Windows (XP/Vista/7)
    Install : Double klik File xampp-win32-1.7.3.exe
    Ubuntu (Linux)
    Install :
    dnd@riyaniezt:~$ sudo tar xvfz xampp-linux-1.7.3a.tar.gz -C /opt
  2. JDBC
    Download “MySQL Connector For Java” : http://dev.mysql.com/downloads/connector/j/
Step 2 : Install
Microsoft Windows (XP/Vista/7)
  1. Ekstrak file “mysql-connector-java-5.1.18.tar.gz”.
  2. copy-kan file “mysql-connector-java-5.1.18-bin.jar” ke directory : “C:\Program Files\Java\jdk1.7.0_02\lib”.
Ubuntu (Linux)
  1. Ekstrak file “mysql-connector-java-5.1.18.tar.gz”
  2. Copy-kan file “mysql-connector-java-5.1.18-bin.jar” ke directory : “/opt/java/jdk1.7.0_02/lib/”,Console :
    dnd@riyaniezt:~$ sudo cp  mysql-connector-java-5.1.18-bin.jar /opt/java/jdk1.7.0_02/lib/
Step 3 : Konfigurasi CLASSPATH
Microsoft Windows (XP/Vista/7)
  1. Klik kanan icon My Computer, kemudian klik Properties,
  2. Kemudian pilih Advanced System Setting,
  3. Setelah muncul window System Properties,
  4. Pilih tab Advanced klik Environment Variables, maka akan muncul window Environment Variables ,
  5. Untuk menambahkan CLASSPATH, Pada bagian System variables klik New ,
  6. Pada text box Variable name isi dengan CLASSPATH,
  7. Pada Variable value isi dengan Alamat dari directory dimana MySQL Conector diletakkan,
    .;C:\Program Files\Java\jdk1.7.0_02\libmysql-connector-java-5.1.18-bin.jar
  8. Klik OK sebanyak tiga kali berturut-turut,
  9. Untuk memastikan setingan sudah berhasil, buka Command Prompt (CMD)
    echo %CLASSPATH%
  10. Restart komputer.
Ubuntu (Linux)
    1. File Dependencies,
      dnd@riyaniezt:~$ sudo apt-get install libmysql-java
    2. Edit File “Environment”,
      dnd@riyaniezt:~$ sudo gedit /etc/environment
    3. Tambahkan baris perintah berikut ke dalam file “Environment” :
      CLASSPATH=".:/opt/java/jdk1.7.0_02/lib/mysql-connector-java-5.1.18-bin.jar"
kemudian Save.
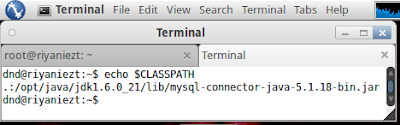
  1. Tulis perintah berikut (untuk memastikan bahwa setingan JDBC telah berhasil)
    dnd@riyaniezt:~$ echo $CLASSPATH
    .:/opt/java/jdk1.7.0_02/lib/mysql-connector-java-5.1.18-bin.jar
    dnd@riyaniezt:~$
  2. Restart komputer.
    dnd@riyaniezt:~$ sudo reboot
Step 4 : Test Koneksi JDBC & MySQL
import java.sql.Connection;
import java.sql.DriverManager;

class TestJDBC
{
  private static final String url = "jdbc:mysql://localhost";
  private static final String user = "[Insert User to access MySQL]";
  private static final String password = "[Insert password to access MySQL]";

  public static void main(String args[])
  {
    try
     {
       Connection con = DriverManager.getConnection(url, user, password);
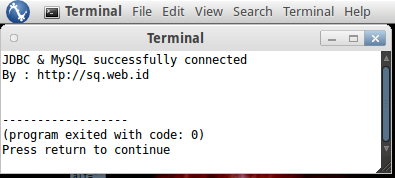
       System.out.println("JDBC & MySQL successfully connected");
       System.out.println("By : http://sq.web.id");
     }
    catch (Exception e)
     {
       e.printStackTrace();
     }
  }
}
Output :
* … Good Luck !… *

Monday, November 26, 2012

Koneksi Java ke MySQL dengan JDBC


Berikut contoh class koneksi Java ke database MySQL menggunakan JDBC. Sebelumnya import library MySQL JDBC Driver ke project. Apabila menggunakan NetBean IDE, caranya adalah klik kanan pada Libraries > pilih Add Library… (gambar 1). Setelah itu baru buat java class dengan nama DatabaseConnection, berikut source codenya:


Sekarang kita bisa panggil class tersebut pada class lain, contohnya buat java class dengan nama TesConnection, berikut contoh source codenya:


References : http://thesuhu.wordpress.com/2011/11/04/koneksi-java-ke-mysql-dengan-jdbc/
http://bisakomputer.com/koneksi-database-mysql-berbasis-gui-menggunakan-java/

Membuat Syntax Highlighter di Blog

Mudah Membuat Syntax Highlighter di Blog ~ Apakah anda merasa asing dengan istilah tersebut atau bahkan sebaliknya, istilah Syntax Highlighter sudah sering terdengar di telinga anda?. Jangan lupa baca juga Cara Mudah Membatasi Jumlah Tampilan Posting Label Blog. 
 
Syntax Highlighter atau Penyorotan Sintaks adalah fitur dari beberapa editor teks yang menampilkan teks, terutama source code dalam berbagai warna serta font sesuai dengan kategori istilah. 
Fitur ini memudahkan kita dalam menulis dalam bahasa terstruktur seperti bahasa pemrograman atau bahasa markup serta penulisan berupa syntax-syntax blog. Berikut ini cara membuat syntax highlighter di blog :
1.       Login ke akun blogger anda
2.       Klik Menu Rancangan, lalu pilih Edit HTML
3.       Jangan lupa centang terlebih dahulu
4.       Cari kode ]]></b:skin> dan letakkan kode di bawah ini sebelum kode ]]></b:skin>


5.       Cari kode </head> dan letakkan kode di bawah ini sebelum kode </head>


6.       Cari kode </body> dan letakkan kode di bawah ini sebelum kode </body>


Info :
Setiap mempublikasikan post yang terdapat kode-kode di dalamnya, sobat blogger harus memasukkan kode tersebut seperti contoh d bawah ini!

<textarea name="code" class="c#" cols="60" rows="10">
Kode Yang Akan Ditampilkan Diletakkan Disini
</textarea>

References : http://bangvandawablog.blogspot.com/2012/10/cara-mudah-membuat-syntax-highlighter-diblog.html

Wednesday, November 14, 2012

Disk drive for /boot is not ready yet or not present?

fter a long gap,I am back to Ubuntu from Fedora and I am really impressed by the pleasing interface ‘Lucid Lynx’ comes up with. :-)
After installing Windows XP ,I installed Ubuntu 10.04.The installation process was smooth.But the problem I faced when I restarted the system is, at the splash startup screen.It said ,
The disk drive for /boot is not ready yet or not present.
Continue to wait, press S to skip or M for manual recovery.
I waited for a long time and it is of no use.so I skipped the process and edited some file to mount it automatically.
here is what I did,

1.Open your terminal by ctrl+alt+t or Applications –> Accessories –> Terminal

2.use the below command in terminal,

gksudo gedit /etc/fstab

3.A file will open,find /boot line.It will look something like this ,

/dev/sda2 /boot ext4 defaults 0 0

4.Now open another terminal and use the below command ,

ls -l /dev/disk/by-uuid

5.Now find the UUID for /dev/sda2 and replace the below line in fstab ,

/dev/sda2 /boot ext4 defaults 0 0

as

UUID=a647ea33-74ee-4123-84bf-7edc32e2e39b /boot ext4 defaults 0 0

[Replace the UUID number with your number]

6.save the file and restart the system.It will work fine.The same solution can be addressed for /dev/sda mounting problem.
;-)

Tuesday, November 13, 2012

Mysql Password Reset


Content Cleanup Required: This article should be cleaned-up to follow the content standards in the Wiki Guide. More info...
Please do not make any edits to this article. Its contents are currently under review and being merged with the Ubuntu Server Guide. To find the Ubuntu Server Guide related to your specific version, please go to:

Why are you looking at this wiki page?

Are you looking at this page because you cannot access the mysql server installed on your pc/server when you were trying to see if it works well? Or do you receive error messages like the following? :
ERROR 1045: Access denied for user: 'root@localhost' (Using 
password: NO)
or
ERROR 1045: Access denied for user: 'root@localhost' (Using 
password: YES)
To resolve this problem ,a fast and always working way is the "Password Resetting" .

How can I reset my MySQL password?

IconsPage/IconWarning3.png Following this procedure, you will disable access control on the MySQL server. All connexions will have a root access. It is a good thing to unplug your server from the network or at least disable remote access.
To reset your mysqld password just follow these instructions :
  • Stop the mysql demon process using this command :
    •    sudo /etc/init.d/mysql stop
  • Start the mysqld demon process using the --skip-grant-tables option with this command
    •    sudo /usr/sbin/mysqld --skip-grant-tables --skip-networking &
Because you are not checking user privs at this point, it's safest to disable networking. In Dapper, /usr/bin/mysgld... did not work. However, mysqld --skip-grant-tables did.
  • start the mysql client process using this command
    •    mysql -u root
  • from the mysql prompt execute this command to be able to change any password
    •    FLUSH PRIVILEGES;
  • Then reset/update your password
    •    SET PASSWORD FOR root@'localhost' = PASSWORD('password');
  • If you have a mysql root account that can connect from everywhere, you should also do:
    •    UPDATE mysql.user SET Password=PASSWORD('newpwd') WHERE User='root';
  • Alternate Method:
    •    USE mysql
         UPDATE user SET Password = PASSWORD('newpwd')
         WHERE Host = 'localhost' AND User = 'root';
  • And if you have a root account that can access from everywhere:
    •    USE mysql
         UPDATE user SET Password = PASSWORD('newpwd')
         WHERE Host = '%' AND User = 'root';
For either method, once have received a message indicating a successful query (one or more rows affected), flush privileges:
FLUSH PRIVILEGES;
Then stop the mysqld process and relaunch it with the classical way:
sudo /etc/init.d/mysql stop
sudo /etc/init.d/mysql start
When you have completed all this steps ,you can easily access to your mysql server with the password you have set in the step before. An easy way to have a full control of your mysql server is phpmyadmin (www.phpmyadmin.net), software made in php that can give you a web interface that can be very usefull to people that havent got a lot of confidence with bash .To install phpmyadmin on you server you will need to have 4 things:
  • web server apache
  • php
  • mysql server/mysql client installed
  • php_mysql support for apache
All packages can be found browsing synaptic.

Another way, purge

I also had some problems with mysql just not accepting my password. I tried the other way as well and it just ended up being difficult. I had not been able to use mysql so it was empty anyway. If this is also your case you may opt for the PURGE way. This removes every file related to mysql. Depending on your installation the packages might be diffrent, mysql-server in 6.10 is called mysql-server-5.0 as an example.
IconsPage/IconWarning3.png USE THIS AS A LAST RESORT METHOD, YOU WILL LOSE ALL YOUR MYSQL DATA
sudo apt-get --purge remove mysql-server mysql-common mysql-client
sudo apt-get install mysql-server mysql-common mysql-client
In the next step be sure to chance the your-new-password with the password you want!
mysqladmin -u root password your-new-password
sudo /etc/init.d/mysql restart
mysql -u root -p
You should now be logged in as root. Make sure to notedown your password! Thanks to Illuvator for posting this method in the ubuntu forum.
MysqlPasswordReset (last edited 2011-03-14 21:42:35 by anatol)

Monday, November 12, 2012

Remote Desktop Logins directly from the login screen has been enabled in Ubuntu 12.10.

Support for Remote Desktop Logins directly from the login screen has been enabled in Ubuntu 12.10.
The feature will allow you to enter a full-screen remote login without needing to login to Ubuntu itself, or install additional apps. It all happens ‘out of the box’.
Now, as if that wasn’t handy enough Canonical are also integrating Remote Login with the Ubuntu Single Sign On service.
The result of this tie-up is that you won’t need to remember endless technical logins, server hosts and passwords; you just ener your Ubuntu One account details and the greeter will pull in your Remote data.

Adding Remote Login Data

In the version of Remote Login in Ubuntu 12.10 at present you can’t use the feature without using the Ubuntu SSO method. If you just want to hammer in the details directly you can’t – you’ll still need to login to a session and use one the Remmina client.
But if you already have an Ubuntu One account then you’re all set. Hit the ‘?’ icon in the upper-right of the login box and you’ll see a set-up prompt appear.
Clicking ‘Ok’ on this launches an Ubuntu guest session, with Firefox already opened on the UCCS page.
Hit the ‘Remote Desktops’ tab, enter your Ubuntu One account details, followed by ‘ Add Remote Desktop’ button.

Three types of ‘remote’ connections are supported at present:
After you’re done adding (and you’ve remembered to hit ‘Add’) you can log out of the guest session and return to the main login screen. Here, select the ‘Remote Login’ option and enter your Ubuntu Single Sign On details.
After a brief stutter the remote desktops you added to your account will be available for you to select:

Image Credit: Ted Gould

Connect to Ubuntu 11.04 from Windows via Remote Desktop

Connect to Ubuntu 11.04 from Windows via Remote Desktop

Last week we showed you how to use Remote Desktop Protocol (RDP) to connect from Ubuntu to Windows 7. Today, I will show you how to use the same Remote Desktop Protocol to connect from Windows to Ubuntu 11.04 Natty Narwhal. If you ever wanted to connect to Ubuntu via Remote Desktop Connection, then this tutorial will help you do that.
There are many ways to connect to Ubuntu from Windows and RDP protocol is just one of the many ways.


Getting started:

To get started, press Ctrl – Alt – T on your keyboard to open Terminal. When Terminal opens, type the command below to install xrdp server.
sudo apt-get install xrdp
natty_xrdp

Next, go to Start –> All Programs –> Accessories –> Remote Desktop Connection from your Windows computer and type the IP address or Hostname of the Ubuntu machine then click ‘Connect’

natty_xrdp_1

When prompted, enter your Ubuntu username and password and click ‘OK’

natty_xrdp_2

Enjoy!

natty_xrdp_3

That’s all to it.

You may also like -

Saturday, July 9, 2011

Quick subnet calculating techniques


Note:
It is highly suggested to read the above prerequisite link before reading this topic due to some terminologies and understanding of the link content. Basically this is the 2nd chapter of the prerequisite link content. Even when you feel you understand Class C network subnetting already and are ready to move up to the next level, it is always a good idea to refresh the concepts and some definitions.


The Basic Concept


Similar to Class C subnet calculation (/24 or smaller subnet), basic concept applies to Class B (/16 or smaller subnet up to /23) and Class A (/8 or smaller subnet up to /15) subnet calculations. When the first 3 octets in Class C subnet calculation are always constant and only last octet changes (as shown above), the first 2 and last octets in Class B subnet calculation are always constant where only the third octet changes. Similarly, the first and last two octets in Class A subnet calculation are always constant where only the second octet changes.


Quick Review


Let's review a 192.168.0.0/23 network. As you can see, this is a broadcast network. You can then determine the following


192.168.0.0/23
IP Address           : 192.168.0.0
Subnet Mask          : /23 (or 255.255.254.0)
IP address range     : 192.168.0.0 - 192.168.1.255
Network ID           : 192.168.0.0
Network Broadcast    : 192.168.1.255
Host IP address range: 192.168.0.1 - 192.168.1.254


Understanding /23 and Larger Network


In 255.255.255.254 (/31), you can see this as a network that consists of two 255.255.255.255 (/32) networks. You can apply the same understanding on looking /23 network. By considering the last octet, you should be able to see 255.255.254.0 (/23) as a network consisting of two 255.255.255.0 (/24) networks.


The above concepts show that you can see subnet as groups of multiple single IP addresses (/32) or as groups of multiple smaller subnets. Recall that in the »Cisco Forum FAQ »Quick and Easy Subnetting on Routing, Switching and Network Design Relationship, there are illustrations showing such in Class C network subnetting.


Following is a list of smaller subnet groups to make up Class B network


/16 = 2 x /17 = 4 x /18 = 8 x /19 = 16 x /20 = 32 x /21 = 64 x /22 = 128 x /23 = 256 x /24
/17 = 2 x /18 = 4 x /19 = 8 x /20 = 16 x /21 = 32 x /22 = 64 x /23 = 128 x /24
/18 = 2 x /19 = 4 x /20 = 8 x /21 = 16 x /22 = 32 x /23 = 64 x /24
/19 = 2 x /20 = 4 x /21 = 8 x /22 = 16 x /23 = 32 x /24
/20 = 2 x /21 = 4 x /22 = 8 x /23 = 16 x /24
/21 = 2 x /22 = 4 x /23 = 8 x /24
/22 = 2 x /23 = 4 x /24
/23 = 2 x /24


The same concept applies to both Class B and Class A network subnetting. While the Class B network (such as /23 network or larger up to /16) can be seen as groups of Class C networks (/24) as shown, the same concept applies to Class A network (/15 network or larger) where the Class A network can be seen as groups of Class B networks.


Following is a list of smaller subnet groups to make up Class A network


/8 = 2 x /9 = 4 x /10 = 8 x /11 = 16 x /12 = 32 x /13 = 64 x /14 = 128 x /15 = 256 x /16
/9 = 2 x /10 = 4 x /11 = 8 x /12 = 16 x /13 = 32 x /14 = 64 x /15 = 128 x /16
/10 = 2 x /11 = 4 x /12 = 8 x /13 = 16 x /14 = 32 x /15 = 64 x /16
/11 = 2 x /12 = 4 x /13 = 8 x /14 = 16 x /15 = 32 x /16
/12 = 2 x /13 = 4 x /14 = 8 x /15 = 16 x /16
/13 = 2 x /14 = 4 x /15 = 8 x /16
/14 = 2 x /15 = 4 x /16
/15 = 2 x /16


Some discussions


»[CCNA] Calculating VLSM summary for ICEND2
»Route Summarization


Determine Subnet Mask Format


You may wonder how to state the subnet mask format as 255.255.254.0. Determine such basically follows the same understanding as determine 255.255.255.254 (the /31).


As you may notice, the 255 represents one of 255 and the 254 represents two of 255. In /31 (255.255.255.254), there are two 255 (two 255.255.255.255). By applying the same understanding, there are two 255 (two 255.255.255.0) in /23 (255.255.254.0).


Determine IP Address Number


In /24 or smaller networks (within Class C network),
/32 = 255.255.255.255 = 1   IP address
/31 = 255.255.255.254 = 2   IP addresses
/30 = 255.255.255.252 = 4   IP addresses
/29 = 255.255.255.248 = 8   IP addresses
/28 = 255.255.255.240 = 16  IP addresses
/27 = 255.255.255.224 = 32  IP addresses
/26 = 255.255.255.192 = 64  IP addresses
/25 = 255.255.255.128 = 128 IP addresses
/24 = 255.255.255.0   = 256 IP addresses = a single Class C network


Within Class B network, you have the following
/24 = 255.255.255.0 = 1   Class C network  = 1   x 256 = 256 IP addresses
/23 = 255.255.254.0 = 2   Class C networks = 2   x 256 = 512 IP addresses
/22 = 255.255.252.0 = 4   Class C networks = 4   x 256 = 1024 IP addresses
/21 = 255.255.248.0 = 8   Class C networks = 8   x 256 = 2048 IP addresses
/20 = 255.255.240.0 = 16  Class C networks = 16  x 256 = 4096 IP addresses
/19 = 255.255.224.0 = 32  Class C networks = 32  x 256 = 8192 IP addresses
/18 = 255.255.192.0 = 64  Class C networks = 64  x 256 = 16384 IP addresses
/17 = 255.255.128.0 = 128 Class C networks = 128 x 256 = 32768 IP addresses
/16 = 255.255.0.0   = 256 Class C networks = 256 x 256 = 65536 IP addresses = one Class B  network


Note that the concept of size doubling still applies in Class B network as in Class C network as mentioned. As illustrations, there are 2 of /24 within /23; 2 of /23 within /22; and 2 of /18 within /17 networks.


Implementing /23 Network


Let's say an organization decide to use 192.168.0.0/23 as a single subnet without subnetting it to smaller subnets. Let's say the gateway IP address would be 192.168.0.1, although in reality a gateway IP address can be any IP address within valid range of 192.168.0.1 - 192.168.1.254.


Some hosts within the subnet will have the following network info


192.168.0.34/23
IP Address           : 192.168.0.34
Subnet Mask          : /23 (or 255.255.254.0)
IP address range     : 192.168.0.0 - 192.168.1.255
Network ID           : 192.168.0.0
Network Broadcast    : 192.168.1.255
IP Address Order #   : 35
Gateway IP Address   : 192.168.0.1
Host IP address range: 192.168.0.2 - 192.168.1.254


192.168.1.0/23
IP Address           : 192.168.1.0
Subnet Mask          : /23 (or 255.255.254.0)
IP address range     : 192.168.0.0 - 192.168.1.255
Network ID           : 192.168.0.0
Network Broadcast    : 192.168.1.255
IP Address Order #   : 257
Gateway IP Address   : 192.168.0.1
Host IP address range: 192.168.0.2 - 192.168.1.254


192.168.0.255/23
IP Address           : 192.168.0.255
Subnet Mask          : /23 (or 255.255.254.0)
IP address range     : 192.168.0.0 - 192.168.1.255
Network ID           : 192.168.0.0
Network Broadcast    : 192.168.1.255
IP Address Order #   : 256
Gateway IP Address   : 192.168.0.1
Host IP address range: 192.168.0.2 - 192.168.1.254


Octet and Subnet Calculation


Similar to /24 and smaller subnets, we keep referring to octets when working with /23 or larger subnets. As illustration, let's say you have 192.168.65.27/22 network. You need to determine the following


* the network range
* the IP address order number


You need to see the /22 network as part of larger /16 network (the whole 192.168.0.0 Class B network). /22 equals to 255.255.252.0. The 252 means that there are four /24 networks. On the 1st /22 network, the 3rd octet range would be .0 to .3.


Here is the breakdown on the 1st network
192.168.0.0/22       = 192.168.0.0/24, 192.168.1.0/24, 192.168.2.0/24, 192.168.3.0/24
                     = 192.168.0.0 - 192.168.3.255
 
Network ID           : 192.168.0.0
Network Broadcast    : 192.168.0.255
Host IP Address range: 192.168.0.1 - 192.168.3.254


The remaining networks would be the following
192.168.4.0  - 192.168.7.255  = 192.168.4.0/22
192.168.8.0  - 192.168.11.255 = 192.168.8.0/22
192.168.12.0 - 192.168.15.255 = 192.168.12.0/22
192.168.16.0 - 192.168.19.255 = 192.168.16.0/22
192.168.20.0 - 192.168.23.255 = 192.168.20.0/22
192.168.24.0 - 192.168.27.255 = 192.168.24.0/22
192.168.28.0 - 192.168.31.255 = 192.168.28.0/22
192.168.32.0 - 192.168.35.255 = 192.168.32.0/22
192.168.36.0 - 192.168.39.255 = 192.168.36.0/22
192.168.40.0 - 192.168.43.255 = 192.168.40.0/22
192.168.44.0 - 192.168.47.255 = 192.168.44.0/22
192.168.48.0 - 192.168.51.255 = 192.168.48.0/22
192.168.52.0 - 192.168.55.255 = 192.168.52.0/22
192.168.56.0 - 192.168.59.255 = 192.168.56.0/22
192.168.60.0 - 192.168.63.255 = 192.168.60.0/22
192.168.64.0 - 192.168.67.255 = 192.168.64.0/22
  .
  .
  .
  .
192.168.252.0 - 192.168.255.255 = 192.168.252.0/22


As you can see, the 192.168.65.27/22 within the 192.168.64.0/22 network with order number of 283.


Some Tips and Tricks


1. Convert CIDR Subnet Mask Format To Dotted 4-Tuple Format


Note that when deals with /24 network or longer prefix, you only focus on the last octet. With Class B network, it is similar concept with focusing on the 3rd octet.


Class B network is between /16 and /23 CIDR. As mentioned, you only focus on the 3rd octet where the 1st two and last octets are constant. In other word, only the 3rd octet is changing as follows.


/24: 255.255.255.0
/23: 255.255.254.0
/22: 255.255.252.0
/21: 255.255.248.0
/20: 255.255.240.0
/19: 255.255.224.0
/18: 255.255.192.0
/17: 255.255.128.0
/16: 255.255.0.0


With Class B, there is a similar formula to convert CIDR format into dotted 4-tuple format by holding on these


* The "longest" Class B network (the /24) always has 255 as the 3rd octet
* The /24 always has a single Class C network
* The next larger Class B network is always double size of the current Class B network. In other word, the next larger Class B network has double quantities of Class C network than the current Class B network
* The 1st two octet are always 255 and the last octet is always 0 where the 3rd octet is changing


For illustration, you like to convert /18 CIDR into dotted 4-tuple format.


The 3rd octet on the Class B network:
CIDR     current 3rd        previous number        new current 3rd 
         octet number     of Class C network        octet number
 
/24:         255       -           0           =        255
/23:         255       -           1           =        254
/22:         254       -       2  (1 x 2)      =        252 
/21:         252       -       4  (2 x 2)      =        248 
/20:         248       -       8  (4 x 2)      =        240
/19:         240       -      16  (8 x 2)      =        224
/18:         224       -      32 (16 x 2)      =        192


Since the 1st two octet are always 255 and the last octet is always 0, then the /18 CIDR is equal to 255.255.192.0 subnet mask.


2. Find Out IP Address Quantity Within Specific Subnet


There is also similar formula like the one with the Class C network subnetting


(256 - The 3rd Octet) x 256 = IP Address Quantity Within Specific Subnet


Illustration
/24: (256 - 255) x 256 =   1 x 256 =   256 IP addresses within the subnet
/23: (256 - 254) x 256 =   2 x 256 =   512 IP addresses within the subnet
/22: (256 - 252) x 256 =   4 x 256 =  1024 IP addresses within the subnet
/21: (256 - 248) x 256 =   8 x 256 =  2048 IP addresses within the subnet
/20: (256 - 240) x 256 =  16 x 256 =  4096 IP addresses within the subnet
/19: (256 - 224) x 256 =  32 x 256 =  8192 IP addresses within the subnet
/18: (256 - 192) x 256 =  64 x 256 = 16384 IP addresses within the subnet
/17: (256 - 128) x 256 = 128 x 256 = 32768 IP addresses within the subnet
/16: (256 - 0)   x 256 = 256 x 256 = 65536 IP addresses within the subnet


3. Reverse Bit Correlation Between Subnet Mask and Number of IP Address


Let's visit the binary format of Class B network
CIDR   Dotted 4-Tuple                 Binary
 
         O C T E T                  O C T E T
       1st.2nd.3rd.4th     1st   .  2nd   .  3rd   .  4th
 
/24:   255.255.255.0   = 11111111.11111111.11111111.00000000 
/23:   255.255.254.0   = 11111111.11111111.11111110.00000000
/22:   255.255.252.0   = 11111111.11111111.11111100.00000000
/21:   255.255.248.0   = 11111111.11111111.11111000.00000000
/20:   255.255.240.0   = 11111111.11111111.11110000.00000000
/19:   255.255.224.0   = 11111111.11111111.11100000.00000000
/18:   255.255.192.0   = 11111111.11111111.11000000.00000000
/17:   255.255.128.0   = 11111111.11111111.10000000.00000000
/16:   255.255.0.0     = 11111111.11111111.00000000.00000000


There is similar correlation between subnet mask and IP address quantity within the subnet on Class B network as on the Class C network. You can apply this correlation to find out smaller subnet quantity when subnetting Class B network into smaller Class C network. Here is the process.


* Find out the number of CIDR form of the smaller subnet, i.e. /n
* Take n as the power of two as 2^n
* Calculate 2^n
* The 2^n represents the number of /n subnet will be when subnetting a Class B network into /n subnet


Let's have an illustration. Say you have a full Class B network and you subnet it into smaller /28 network. You like to know how many /28 subnets will be, assuming you can use Subnet Zero.


Recall the /24 subnetting process where you only focus on the last octet. With Class B subnetting process, you only focus on the last two octets; the 3rd and the 4th.


The /28 network in binary format has the 1st 28 bits set to one where the remaining 4 bits are set to zero. Let's remove the 1st two octets and just focus on the last two octets.


When only focusing on the last two octets, there are the 1st 12 bits set to one where the remaining 4 bits are set to zero. Take the 1st bits that are set to one, which is 12; as the power of two as 2^12. The 2^12 equals to 4096. This 4096 represents the number of /28 subnet will be when subnetting a Class B network into /28 subnet.


Let's calculate how many /28 subnet will be within full Class B network using different method. As you may recall, there are 16 of /28 subnets within Class C network. Using the concept of size doubling, then you have the following table.
/24:   16 of /28 subnets
/23:   32 of /28 subnets
/22:   64 of /28 subnets
/21:  128 of /28 subnets
/20:  256 of /28 subnets
/19:  512 of /28 subnets
/18: 1024 of /28 subnets
/17: 2048 of /28 subnets
/16: 4096 of /28 subnets


As to find out quickly the number of IP address within the a Class B network, you are using the same concept as dealing with the Class C network; which is based on the number of bits that are set to zero.


Following is an illustration. When you have let's say /19 network; there are the 1st 19 bits set to one and the remaining 13 bits set to zero. Take this number 13 as the power of two as 2^13. The 2^13 = 8192. This 8192 represents the number of IP addresses within the /19 network.


As you may notice, the illustration assumes you can use Subnet Zero.


4. Determine Smaller Subnet Range


Problem 1:
Let's say you have a full Class B network, which is 172.16.0.0/16 network. You subnet it into smaller /28 network. You like to find out how the 897th of /28 subnet looks like.


Here are the process


* Find out how many subnets will be if the bigger subnet is /24
* Take the number of the subnets and assigns it into m
* Take a number n as of n-th of the smaller subnet
* Calculate (n - 1) / m
* When the calculation result is a round number, such number represents the 3rd octet of the n-th subnet. In addition, the 4th octet equals to 0
* The 1st and 2nd octets are always constants
* The IP address represented as such 1st, 2nd, 3rd, and 4th octets is the Network ID
* The Network Broadcast last octet = m - 1


Using the illustration, you need to find out how many /28 subnets within /24 network. As you may recall, there are 16 of /28 subnets within /24 network. You are finding out the 897th of the /28 subnet range is. Therefore


n = 897, m = 16


When you calculate (n - 1) / m, you have


(n - 1) / m = (897 - 1) / 16 = 56


Since 56 is a round number, then the following two occur


* The 56 represents as the 3rd octet
* The 4th octet equals to 0


The 1st and 2nd octets are always constant. As a result, the IP address you have is 172.16.56.0; which is also the Network ID IP address. As to the Network Broadcast,


Network Broadcast IP address last octet = m - 1 = 16 - 1 = 15


The 897th /28 subnet itself look like the following


172.16.56.0/28 = 172.16.56.0 - 172.16.56.15


where
Network ID IP address       : 172.16.56.0
Network Broadcast IP address: 172.16.56.15
Usable IP address for hosts : 172.16.56.1, 172.16.56.2, ...., 172.16.56.14


Problem 2:
Let's say you have a full Class B network, which is 172.16.0.0/16 network. You subnet it into smaller /28 network. You like to find out how the 3117th of /28 subnet looks like.


There is a similar process as previous problem, with some additional steps to deal with non-round number.


* Find out how many subnets will be if the bigger subnet is /24
* Take the number of the subnets and assigns it into m
* Take a number n as of n-th of the smaller subnet
* Calculate (n - 1) / m
* When the calculation result is not a round number, you only consider the round number part and remove the fraction
* The round part represents the 3rd octet
* Multiple the round number part (the 3rd octet) by m
* Add the result by 1
* Assign p as the final result, where p = (the 3rd octet x m) + 1
* The result of (n - p) x m represents the Network ID IP address last octet
* The result of (Network ID IP address last octet + (m - 1)) represents the Network Broadcast IP address last octet
* The 1st and 2nd octets are always constants
* The IP address represented as such 1st, 2nd, 3rd, and 4th (last) octets is the n-th of how the smaller subnet look like


Using the illustration, you need to find out how many /28 subnets within /24 network. As you may recall, there are 16 of /28 subnets within /24 network. You are finding out the 3117th of the /28 subnet range is. Therefore


n = 3117, m = 16


(n - 1) / m = (3117 - 1) / 16 = 3116/16 = 194.75


The 194.75 is not a round number, so we only consider the round part and remove the fraction. In other word, we take the 194 only. This 194 round number represents the 3rd octet.


p = (the 3rd octet x m) + 1 = (194 x 16) + 1 = 3104 + 1 = 3105


(n - p) x m = (3117 - 3105) x 16 = 192


This 192 represents the last octet of the Network ID IP address. In other word,


3117th subnet Network ID IP address: 172.16.194.192/28


Network ID last octet + (m - 1) = 192 + (16 - 1) = 192 + 15 = 207


This 207 represents the last octet of the Network Broadcast IP address. In other word,


3117th subnet Network Broadcast IP address: 172.16.194.207/28


Since you now have both Network ID and Network Broadcast IP addresses, then the 3117th /28 subnet off the 172.16.0.0/16 looks like the following.


3117th subnet: 172.16.194.192/28 = 172.16.194.192 - 172.16.194.207


where
Network ID IP address       : 172.16.194.192
Network Broadcast IP address: 172.16.194.207
Usable IP address for hosts : 172.16.194.193, 172.16.194.194, ...., 172.16.194.206


Note


1. These two problems assume that you can use Subnet Zero. If you cannot use Subnet Zero, you need to modify the formula although the concept is the same.


2. The p = 3105 represents the 3105-th subnet. In other words, p = n = 3105 in case you like to find out how the 3105th /28 subnet range is.


3. From previous note, you can then apply the formula or process within Problem 2 into Problem 1 with the same result. In other words, Problem 2 formula or process is in general form compared to the Problem 1.


5. Convert Dotted 4-Tuple Subnet Mask Format Into CIDR Format


Let's say you have 255.255.192.0 subnet mask. You like to know how the subnet mask looks in CIDR format.


You are using the similar process as in the Class C network with the difference of working on the 3rd octet only where the 1st, 2nd, and 4th octets are constant.


Following are the steps when deals with Class B subnetting:


* Focus only on the 3rd octet
* Set the octet as the last octet of a /24 network subnet mask where 1st, 2nd, and 3rd octets are 255
* Determine IP address quantity within the new /24 network subnet
* Find out n where 2^n = IP address quantity within the subnet
* Subtract 8 by n
* Take the subtraction result as additional set-to-one bits to the 1st 16 bits set to one of the full Class B subnet mask
* Add the total number of bits set to one
* This total number represents the CIDR format


Let's use an illustration to convert the 255.255.192.0 into CIDR format. Focus only on the 3rd octet, which is the192.


Set the 192 as the last octet of a /24 network subnet mask as 255.255.255.192


When you build up your own table (or memorize it), you know there are 64 IP addresses within 255.255.255.192 subnet mask.


Find out n where 2^n = 64


By simple calculation (and probably some trial and error), you find that n = 6


Recall the previous discussion that in binary format, all the bits within 1st and 2nd octet of Class B network are set to one. Similarly all bits within the last octet are set to zero. Only bits within the 3rd octet are changing. Let's focus on the bits within this 3rd octet.


As you know, there are 8 bits within the 3rd octet. In /16 network (the full Class B network), all of those 8 bits within the 3rd octet are set to zero. With the value of n = 6, this means that there are 6 last bits set to zero within the 3rd octet itself.


Subtract 8 by 6 to have 2. This 2 represents the remaining 2 bits set to one; which are also the 1st 2 bits within those 8 bits. Take these 2 bits as additional set-to-one bits into the 1st 16 bits of the full Class B subnet mask.


The full Class B subnet mask has the 1st 16 bits set to one. With additional 2 bits set to one, there are total of the 1st 18 bits set to one. Therefore 255.255.192.0 network has the 1st 18 bits set to one (16 + additional 2) where the remaining 14 bits are set to zero.


Since CIDR format bases on the 1st set-to-one bits, the 255.255.192.0 subnet mask is equal to /18 CIDR.